Fall Craft Project: Filet Crochet Pumpkin
- kalianieg
.png/v1/fill/w_320,h_320/file.jpg)
- Oct 18, 2024
- 4 min read
Updated: Oct 18, 2024
Fall Craft Project Oct 2024

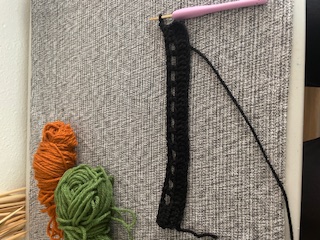
This month I want to share an easy fall craft with you! This project uses chain stitches and double crochet. Filet crochet technique was popular in the late 19th century and is still popular in parts of Europe. I recently learned this technique in a craft book I was studying. So, I wanted to show you how to do it. It was originally used to make curtains and tablecloths, figurative panels and decorative edgings using fine thread. Below I gave an idea of making it into a crochet pouch, but you can crochet it into whatever project you are working on. I think it's an easy and fun design.
Stitch Abbreviations:
Ch: Chain
St: Stitch
Dc: Double crochet
Things you will need:
Medium Yarn (in one or various colors) *
Crochet hook 4mm*
Yarn needle
Scissors
Pumpkin pattern
*Of course, the pattern can be made with any type of yarn and hook size. But for this demonstration I will be using a medium weight thread and a size 4mm hook.
What I used:
Left over acyclic yarn in three colors, 100% acrylic yarn
Size 4mm crochet hook

colors used
Notes:
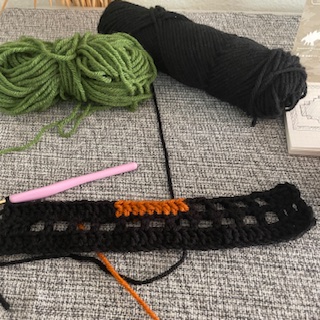
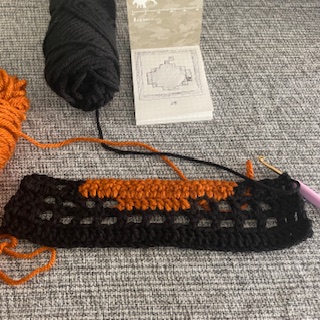
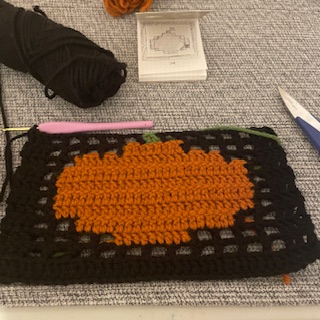
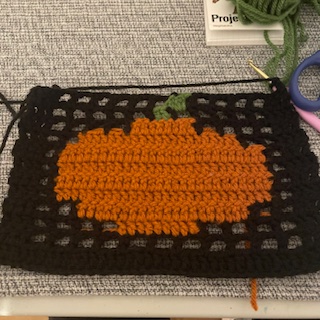
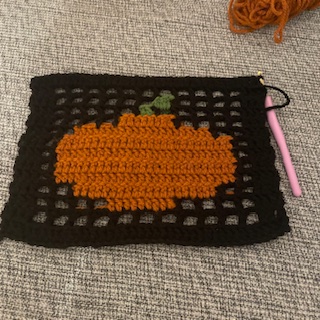
This pattern is worked with double crochet and chains. Every line on the graph vertically is a dc, and every box is either two double crochet stitches or two chains. If the box is colored then it's 2dc, if it’s blank then it’s two chains. Once you get the hang of it you can make your own design and follow your own pattern. For now, I've written the steps in detail.
I’ve posted photos of the pattern with a color change to make it easier to see the pattern. It's a more advanced technique, but through trial and error you can also do multiple color changes.

Pattern:
Chain 40 st
R1: On the third chain from the hook make a double crochet and continue till the end. (38)
R2: Ch 2 and turn. 3dc, (ch 2, skip two and dc into the third st, repeat 8 more times), 2dc (38)
R3: Ch 2 and turn. 3dc, (ch 2, skip two and dc into the third st, repeat 3 more times), dc in the next 9 st, (ch 2, skip two and dc into the third st, repeat 3 more times), 2dc (38)
R4: Ch 2 and turn. 3dc, (ch 2, skip two and dc into the third st, repeat), dc in the next 21 st, (ch 2, skip two and dc into the third st, repeat), 2dc (38)
R5-R7: Ch 2 and turn. 3dc, ch 2, skip two and dc into the third st, dc in the next 27 st, ch 2, skip two and dc into the third st, 2dc (38)
R8: Ch 2 and turn. 3dc, (ch 2, skip two and dc into the third st, repeat), dc in the next 21 st, (ch 2, skip two and dc into the third st, repeat), 2dc (38)
R9: Ch 2 and turn. 3dc, (ch 2, skip two and dc into the third st, repeat 3 more times), dc in the next 9 st, (ch 2, skip two and dc into the third st, repeat 3 more times), 2dc (38)
R10: Ch 2 and turn. 3dc, (ch 2, skip two and dc into the third st, repeat 4 more times), dc in the next 3 st, ch 2, (skip two and dc into the third st, repeat 4 more times) 2dc (38)
R11: Ch 2 and turn. 3dc, (ch 2, skip two and dc into the third st, repeat 5 more times), dc in the next 3 stitches, (ch 2, skip two and dc into the third st, repeat 3 more times), 2dc (38)
R12: Ch 2 and turn, 3dc, (ch 2, skip two and dc into the third st, repeat 8 more times), 2dc (38)
R13: Ch 2 and turn, dc and continue till the end. (38)


Crochet Pouch Assembly
You will need:
Two identical finish patterned pieces. One of the pieces with the yarn still attached.
A zipper
Tapestry needle
Extra yarn
Directions for Craft Project
Take both of the pieces and put them on the wrong sides together, single crochet the pieces together starting from the short edge and work your way around.
When you reach a corner, crochet an increase on both edge stitches to give space to turn. When you reach back to the top of your finished work.
Cut and weave the end and attach the zipper. You can also attach the zipper with a premade chain stitch and crochet the pouch to the zipper. This is the technique I used.
Depending on what you will use the pouch for you can add a cotton lining on the inside. I’d prefer to use a french seam to hide my edges, but you don’t have to.
I hope you enjoyed this post! Check out my other craft project and follow for more. Tag me on social media if you’ve made it. Pattern is free to use, do not sell pattern as your own.
Important Dates!
October 24th: Special comic post
October 26: Outer Sunset Halloween Block Party
November 1st: Comic post
November 4th: New blog post
Links


Comments